Wednesday, August 3, 2016

Touring the Front Garden.

It's finally done.

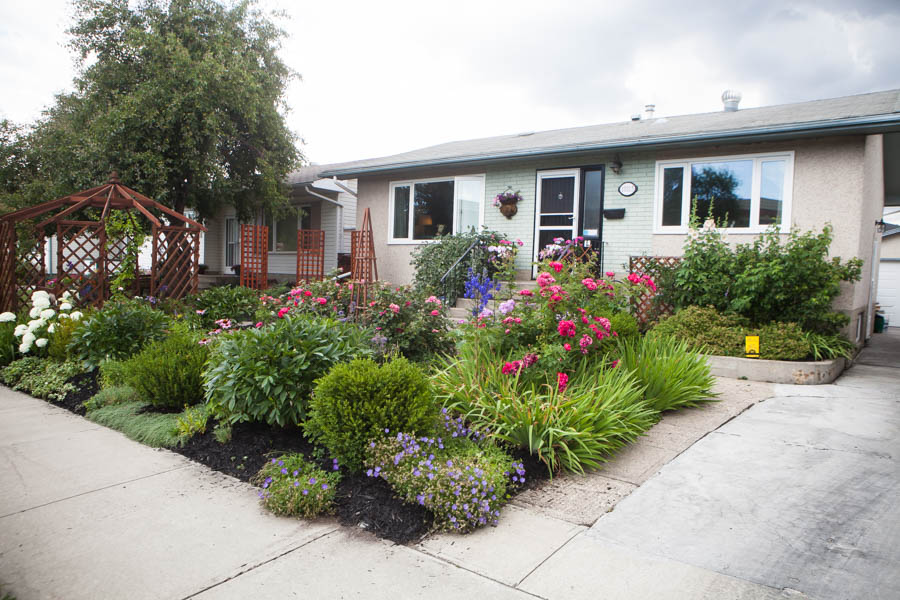
After months of work . . . and months of procrastination . . . the front garden is finally done.

As a matter of fact, it's nearly immaculate. For the first time ever.

Here's the thing. I love, love to plan out a garden. I love playing with different ideas and trying to find ways to use a variety of plants and plan for bloom time as early and as late as humanly possible in my northern prairie garden. I do not love heavy digging or weeding. At all . . . I certainly don't find it therapeutic as so many do. But, I love to look at beautiful gardens. I love to pick bouquets for myself and my friends. And nothing is better than an early morning in the garden, still in pj's, sitting by the pond, with a cup of tea and homemade bread slathered with butter and homemade strawberry jam. Unless of course, I also have a good book to read.

So I compromise. I accept that my garden will always be a little weedy and slightly disheveled. I count on strong design and shrubs to draw the eye away from lurking thistles and that crazy purple bellflower that looks so great . . . until it takes over the entire garden and nothing you do will ever get rid of it.

 I leave room for serendipity in my garden. I can plan each detail until I think the design is perfect and turn around to discover that birds have planted seeds from a garden blocks away, and that one small thing can take a garden from lovely to sublime, even if  just for a day or two. I see God so clearly in those moments. A reminder that He is the ultimate Gardener, and those moments were created specifically for me, because he loves me.

 Serendipity can only happen in a slightly messy garden.

So messy is good right??

But, for the first time, I'm also seeing joy in maintaining my garden. So I'm going to enjoy it while it lasts, because as much as I might tell myself that this time I'm going to keep it up for the entire gardening season, I know myself well enough to know how unlikely that is.

While my garden is at it's best, I thought I'd give you all a little tour . . .

I made the concrete leaves as well as the hands decorating the front gazebo. I love a reason to play around with a little concrete.

And . . . for those of you thinking I'm exaggerating my inability to keep a well tended garden, feel free to drop by for tea in the back garden. But bring your machete with you. You'll need it to make your way to the gazebo . . .

Before


 I hope you enjoyed your little tour!


post signature

Tuesday, January 19, 2016

Flying . . .


Around this time of the year, after a cold snap or two, I start to feel a little cooped up.

 I stay inside as much as humanly possible because I'm a big baby when it comes to cold weather. If it weren't for Jada and the need for groceries, I'd probably stay holed up in my comfy little home for 4 or 5 months of the year!

That's when I start looking through my photo library, dreaming about those beautiful warm days in the sun. I took this image last summer while on a long overdue weekend away with my friend Joyce. (Still to be blogged about. Ahem.)

We gazed at these boats from the deck of a paddle wheeler, the sun hot on our faces, small breeze ruffling our hair, while kids wove in and out of the crowds, looking for the best vantage point, the most adventurous going so far as to climb on benches and hang joyously over the rail.

Watching the boats fly across the water with my dear friend at my side, camera at the ready, the loud splash and swoosh of the paddles in the background  . . . 

Life just doesn't get much better than that does it?

post signature

Wednesday, August 14, 2013

Wordless Wednesday


Friday, July 19, 2013

Hail

I was finally able to get my work area set up today. Between the rain and the extreme heat I haven't had a chance to work on my concrete leaves.

I got everything set up and tried out a new mix on two small leaves. It's so much fun!

I wanted to just keep going but decided to be sensible for a change and wait until tomorrow to see how things worked out first.

A hail storm just blew through here.

 It lasted less than five minutes.

The hostas and rhubarb took the worst of it.

I'm too sad to take any pictures tonight. Maybe on Monday after I've had a good cry.

Right now I'm going to read a good book and eat my way through a bag of sweet and salty popcorn.

And a tub of ice cream . . .


Thursday, July 18, 2013

Living in the Garden . . . a Birthday Tea

It was my sister-in-law Leona's birthday  a while back but I wasn't able to attend her party so I decided to celebrate it in my garden instead.

It took several weeks before we found a time that worked for both of us, but it was worth the wait.

Happy Birthday Leona! Thanks for a lovely visit.


And should any photographer be reading the is post . . . (Chandra)

Please be kind! Once Leona and Ethan left and everything was put away, I went to download the pictures.
Only to realize that I hadn't changed the settings after I had taken a bunch of pictures in the house, in a dark room.

 1600 ISO and a florescent light white balance setting! Arghhh!

I was never so thankful for Lightroom! The pictures are still rather grainy and maybe even a little bluer than I might have liked but . . . they are still pretty.

As I am working hard to let go of my perfectionist ways . . . I posted them anyways.


Monday, July 15, 2013

Step by Step: How to plant a Moss Basket

how to plant a moss basket

As promised on Friday, today's post brings together Superstore, flowers, moss and a feminine hygiene product.

A while back I was approached by a lovely lady representing Superstore's garden center asking if I would be interested in reviewing some of their new plant introductions for this year.

"Hmmm . . . you give me free plants, I get to try them out and tell my readers how I used them and how well they did in my garden???"

I answered the only way an avid gardener could . . . Yes!

It was rather late in the season when we got this all sorted out so I had everything planted up already, but no gardener worth her salt would let that stop her.

I had been tossing around the idea of showing you just how I plant up my moss baskets and this was the perfect opportunity to do it.

From Superstore's garden center I received three Dahlinova Hypnotica 'Tequila Sunrise' annuals (One of which I used in this post) as well as the cutest little 'Pixie Grape'.


What follows is a step by step pictorial tutorial (ahem) on how to plant a moss basket.

* warning to all men and proper women . . . a feminine hygiene product was used in the making of this tutorial . . . (and I still can't believe I am going to post this anyway. I am seriously, one of the most proper women I know. . .)


 *Gather the supplies: I used a wire basket, however you could use any wire container. I bought a bag of sheet moss from a floral wholesale but it is also available at most garden centers. For plants I used  my Superstore dahlia as well as a seriously marked down sage plant and a six pack of alyssum. You will also need a plastic garbage bag, scissors, gloves if you use them and (wince) a maxi pad.

Step 1: Line your container with sheet moss.


Step 2: cut small holes in the bottom of your plastic bag and put that in the container once the moss is in.


Step 3: Here's where the maxi pad comes in. . . and if you find this too weird you do have other options. I just didn't have anything else on hand that day. It helps to hold water in the basket a little longer.

 Option one is the water holding crystals  you can purchase in many garden centers. I don't think there is likely to be much difference from brand to brand

Option 2 is to pull apart the insides of a (clean) diaper as the materials in there work in much the same way as the crystals. Either of these can be mixed with damp soil. Just make sure you hydrate the crystals first if you use them.

I was out of crystals and as my youngest is 20  . . . long past the diaper stage. But maxi pads work this way as well.


Step 4: I cut it in half and folded the wings back. I didn't bother to pull them apart and mix them with the soil.


Step 5: Place on the bottom of the basket making sure you don't cover the drainage holes.


Step 6: Fill with potting mix.


Leave room for plants


Dahlia


Step 7: Plant so the top of the plant is slightly below the top of the basket. Plant too high and water will run out over the top of the basket rather then sinking in.


Step 8: Add in your other plants. Don't hesitate to cram them together a bit. As they will only be in this basket for a season and not all year, this will work just fine.


Step 9: Water thoroughly. Better yet, have the soil moist before you plant and then water. Much more efficient. I was in a hurry . . .


Step 10: cut off the exposed plastic.


Step 11: Tuck in between moss and soil.


Step 12:  Soak smaller pieces of moss in water and squeeze out a bit. Cover the top with the wet moss making sure to cover the edges and exposed soil. This helps the soil in your planter stay damp.


Step 13: Find a lovely place to put your planter in the garden and enjoy!


 *just make sure to keep it watered. Even with the plastic bag a smaller basket like this can dry out fairly quickly.

How pretty is this dahlia? I can't wait to show you what I did with my other goodies . . .

Thank you Superstore!
 
© A Life of Whimsey